First, ask yourself: Why add ore washing and screening?
• Removing dirt from the raw ore: High mud content in the raw ore can easily clog the crusher and screen, affecting production and equipment life. In this case, a ore washer is typically placed before primary crushing (at the feed end).
• Cleaning the final product: To improve the cleanliness of manufactured sand or crushed stone products and meet high-standard construction aggregate requirements, a ore washer is typically placed after final screening (at the finished product end).
• Simultaneous grading and cleaning: Using a sand washer and recovery system can both clean fine sand and recover lost fine particles, improving efficiency.
2. Determine the installation location
This is the cornerstone of the entire project and depends primarily on your production goals and ore characteristics.
• Option A: Install before primary crushing (pre-screening and washing)
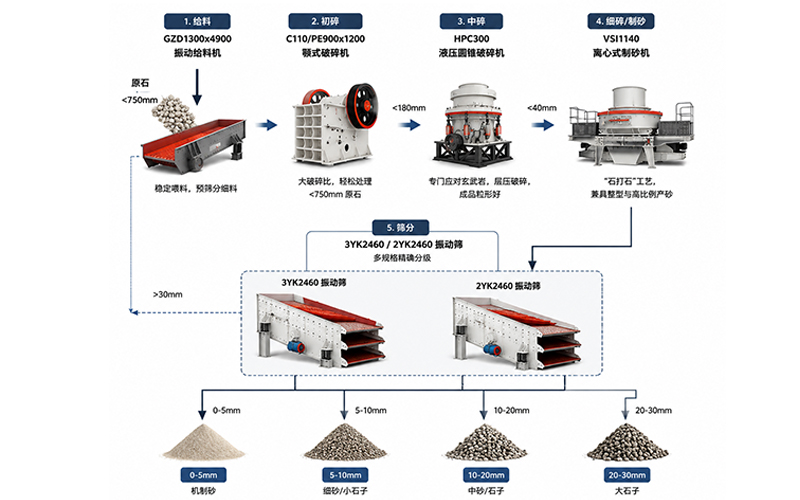
◦ Suitable for: The raw ore has a very high mud content (>10%) and is heavily bonded to clay and stone. ◦ Process Flow: Raw ore -> Grid Screen/Roller Screen (pre-separates large waste rock) -> Ore Washing and Screening Machine (such as a drum washer or trough washer) -> Crushing Line.
◦ Advantages: Fundamentally solves the problem of mud clogging subsequent crushers and screens, improving overall production line efficiency and protecting crushing equipment.
◦ Disadvantages: Requires large volumes of muddy water to be processed, placing high demands on the water treatment system.
• Option B: Install after fine crushing (finished product washing)
◦ Applicable Situations: Raw ore has a low mud content, but after crushing, it has a high stone dust content, or when producing high-purity, high-quality sand and gravel aggregate.
◦ Process Flow: ... -> Vibrating Screen -> Sand Washer (bucket wheel sand washer, spiral sand washer) or Sand Washer/Recovery Machine -> Finished Product Stockpile.
◦ Advantages: Directly improves final product quality and is relatively simple to operate.
◦ Disadvantages: Unavoidable wear on the preceding crushing equipment.
3. Site Survey and Space Assessment
• Space Measurement: Accurately measure the length, width, and height of the planned installation location. Ensure there is sufficient space for the new equipment, maintenance access, and possible chutes.
• Process Integration: Check the height of the existing equipment's inlet and outlet openings and determine the installation foundation height for the new washing equipment to ensure that materials can flow naturally through the chutes and avoid blockage.
• Water and Power Supply: Confirm the availability of nearby water and power sources. Washers consume a lot of water and require a stable water supply and an effective wastewater recycling system.
Step 2: Equipment Selection
Choose the appropriate washing and screening equipment based on your purpose and location:
1. For pre-crushing (processing large, high-mud ore):
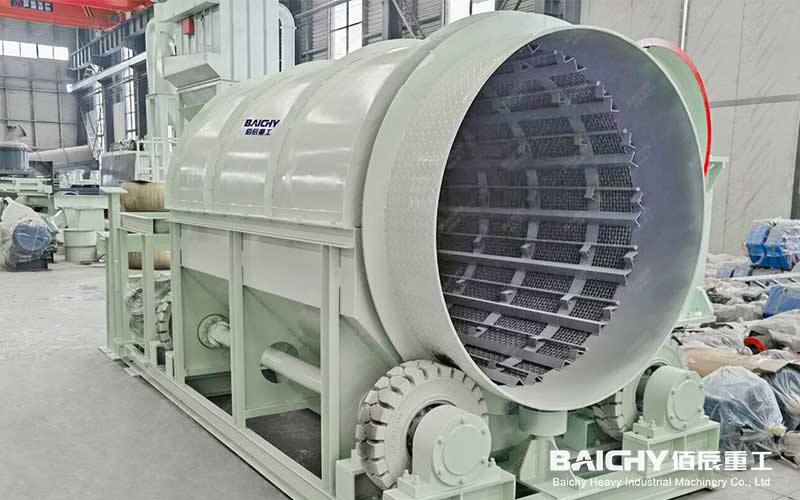
◦ Drum Washer: The rotating drum causes the ore to collide and rub against each other while simultaneously being washed by high-pressure water. It offers high processing capacity and high cleaning efficiency.
◦ Trough Washer: The spiral blades agitate and propel the material, providing a strong cleaning effect and suitable for difficult-to-clean ores.
2. For the finished product stage (cleaning small sand and gravel):
◦ Bucket wheel sand washer: Simple structure, low water consumption, and minimal fine sand loss. Suitable for cleaning fine sand with uniform particle size.
◦ Spiral sand washer: Provides higher cleaning efficiency and also has a certain dewatering function, but relatively high fine sand loss occurs, often requiring use with a fine sand recovery device.
3. Integrated sand washer with sand recovery
This is currently the most popular choice. It combines sand washing, dewatering, and fine sand recovery, effectively reducing sand loss (controlling loss to within 5%-10%) and significantly improving economic efficiency and environmental performance.
Step 3: Process Flow Modification and Integration
This is the core of technical implementation and requires addressing the "how to integrate" issue.
1. Feeding System Modification:
◦ If added before primary crushing, the existing feeder or belt conveyor needs to be modified to direct the material to the new washer.
◦ If added to the finished product stage, a chute needs to be connected from the finished product outlet of the final vibrating screen to the sand washer.
2. Material Conveying Connections:
◦ Upstream Connection: Ensure the angle of the ore washer's feed chute is sufficiently wide (typically greater than 55°) to prevent material accumulation and blockage.
◦ Downstream Connection: Conveyance of washed ore. If the ore washer is located high, it can be fed directly through the chute to the next process (such as a crusher). If it is located parallel or low, an additional belt conveyor will need to be added or the existing one modified.
3. Water Circulation System Construction (Critical!):
◦ Ore washing generates a large amount of slurry, necessitating the construction of a sedimentation tank or thickener.
◦ A typical system includes: ore washer -> chute -> sedimentation tank (usually requiring 2-3 in series) -> clear water tank -> water pump -> ore washer.
◦ The size and number of sedimentation tanks should be designed based on the water volume processed and the slurry settling rate to ensure that the clean water can be recycled, conserving water resources and facilitating sludge removal. 4. Electrical Control System Integration:
◦ Interlock the start/stop signals of the new ore washer's motor with the main control system of the existing production line.
◦ The startup sequence is typically set as follows: water pump -> ore washer -> equipment in the previous process; the shutdown sequence is the reverse. This prevents equipment from idling and material accumulation.
Step 4: Installation and Commissioning
1. Civil Construction: Pour the concrete foundation according to the foundation drawings provided by the equipment manufacturer and reserve holes for anchor bolts.
2. Equipment Hoisting: Use a crane to place the equipment on the foundation, level and align it, and then grout it to secure it.
3. Mechanical and Electrical Installation: Install belts and drive components, connect water pipes and circuits, and connect to the control cabinet.
4. No-Load Test Run: Start the equipment without feeding material and check the motor, reducer, bearings, etc. for abnormal noise, overheating, and smooth operation.
5. Load Test: Feed the material slowly and adjust equipment parameters (such as water volume, inclination angle, speed, etc.) to observe the cleaning effect and processing capacity until optimal conditions are achieved.
6. Personnel Training: Operators and maintenance personnel are trained to familiarize themselves with equipment performance, operating procedures, and routine maintenance points.
Baichy Heavy Industry – Your Trusted Partner for Seamless Equipment Operation
To ensure optimal performance of your equipment, Baichy Heavy Industry offers:
- Professional on-site installation guidance
- Comprehensive operator training
- 24/7 technical support & maintenance services
Our complete after-sales service system guarantees long-term, stable operation of your machinery with minimal downtime.
Protect Your Rights – Only Use Official Channels
To avoid scams and ensure authentic support, contact us exclusively through:
• Official Website: www.baichychina.com
• WhatsApp: +8615093222637
• Email: [email protected]
Your satisfaction is our priority – expect prompt, professional service every time.
(Note: Beware of unauthorized third parties claiming to represent Baichy. Always verify through official contacts.)